概要 netfilter与iptables的关系 linux在内核中对数据包过滤和修改的模块为netfilter,netfilter模块本身并不对数据包进行过滤,只是允许将过滤数据包或修改数据包的函数hook到内核网络协议栈的适当位置。
iptables是用户态的工具,用于向netfilter中添加规则从而实现报文的过滤和修改等功能,工作在ip层。ebtables工作在数据链路层,用于处理以太网帧。
图中绿色代表iptables的表,可以看到有部分位于了数据链路层,之所以产生这种奇怪的架构,原因是bridge_nf模块,因为bridge工作在数据链路层,不一定会经过网络层,但仍然需要iptables的功能。详细信息可以在ebtables/iptables interaction on a Linux-based bridge 中了解。
概念:tables -> chains -> rules
iptabels介绍 chain 每个表都由一组内置的链,还可以添加用户自定义链,只是用户自定义链没有钩子可以触发,需要从其他链通过-j即JUMP进行触发。
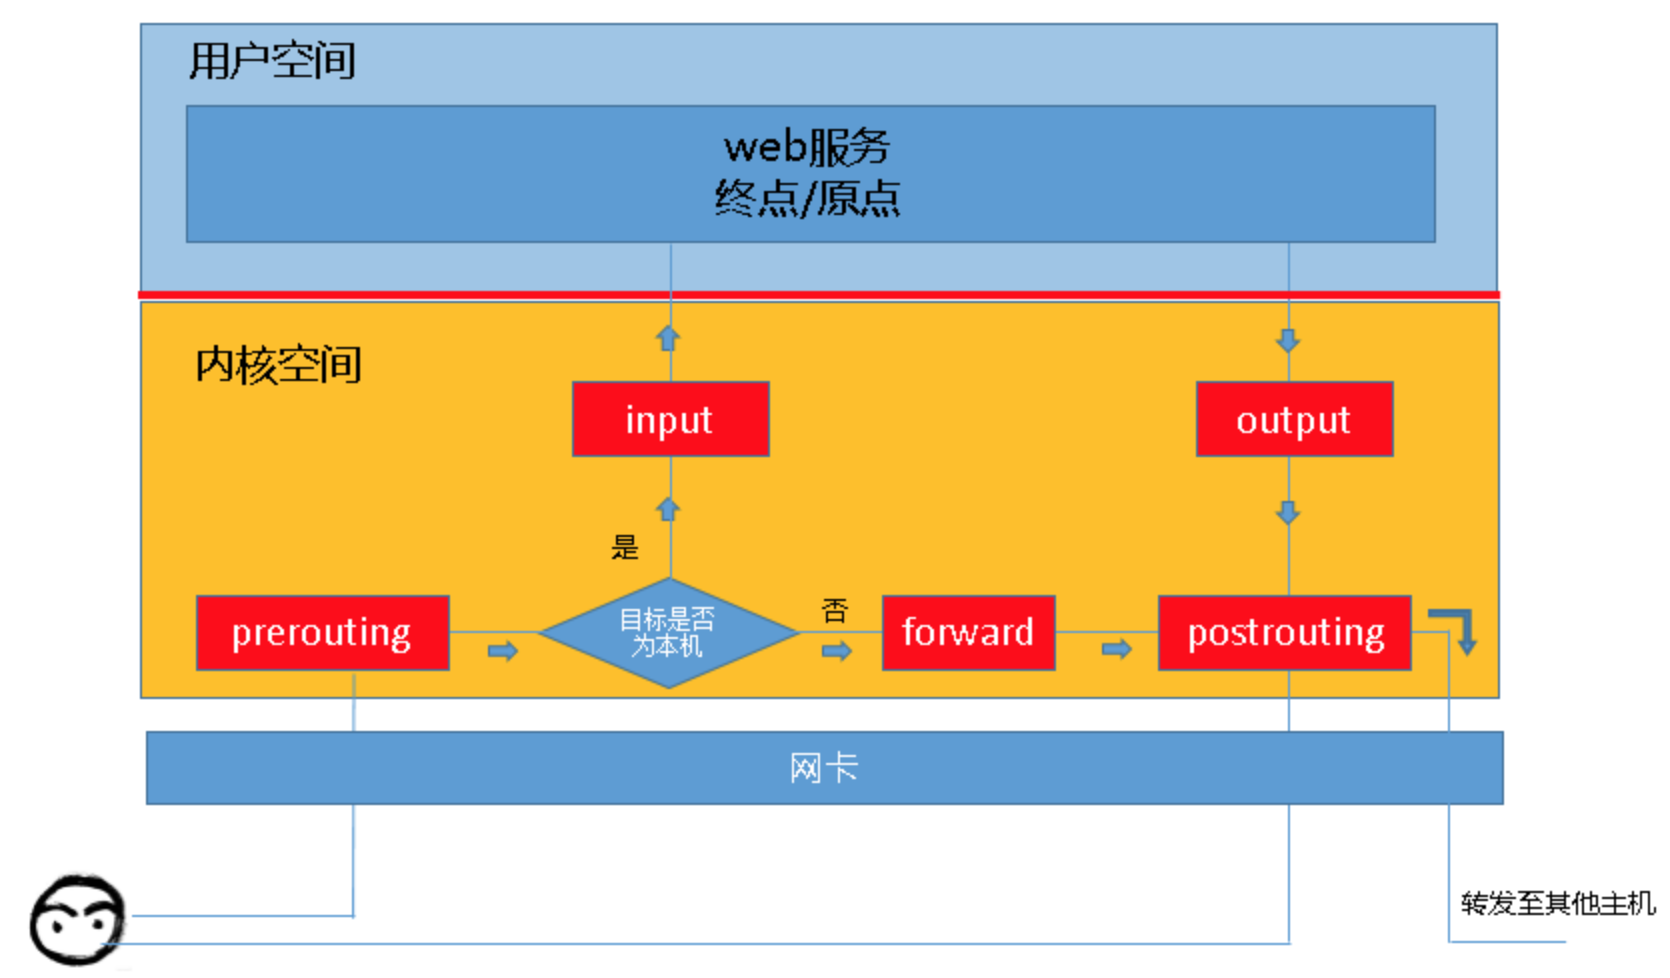
INPUT 链:发往本机的报文
OUTPUT 链:由本机发出的报文
FORWARD 链:经由本机转发的报文
PREROUTING 链:报文到达本机,进行路由决策之前
POSTROUTING 链:报文由本机发出,进行路由决策之后
从chain的角度考虑数据包的流向:
到本机某进程的报文:PREROUTING -> INPUT
由本机转发的报文:PREROUTING -> FORWARD -> POSTROUTING
由本机某进程发出的报文:OUTPUT -> POSTROUTING
当一个网络包进入一台机器的时候,首先拿下 MAC 头看看,是不是我的。如果是,则拿下 IP 头来。得到目标 IP 之后呢,就开始进行路由判断。在路由判断之前,这个节点我们称为 PREROUTING。如果发现 IP 是我的,包就应该是我的,就发给上面的传输层,这个节点叫作 INPUT。如果发现 IP 不是我的,就需要转发出去,这个节点称为 FORWARD。如果是我的,上层处理完毕完毕后,一般会返回一个处理结果,这个处理结果会发出去,这个节点称为 OUTPUT,无论是 FORWARD 还是 OUTPUT,都是路由判断之后发生的,最后一个节点是 POSTROUTING。
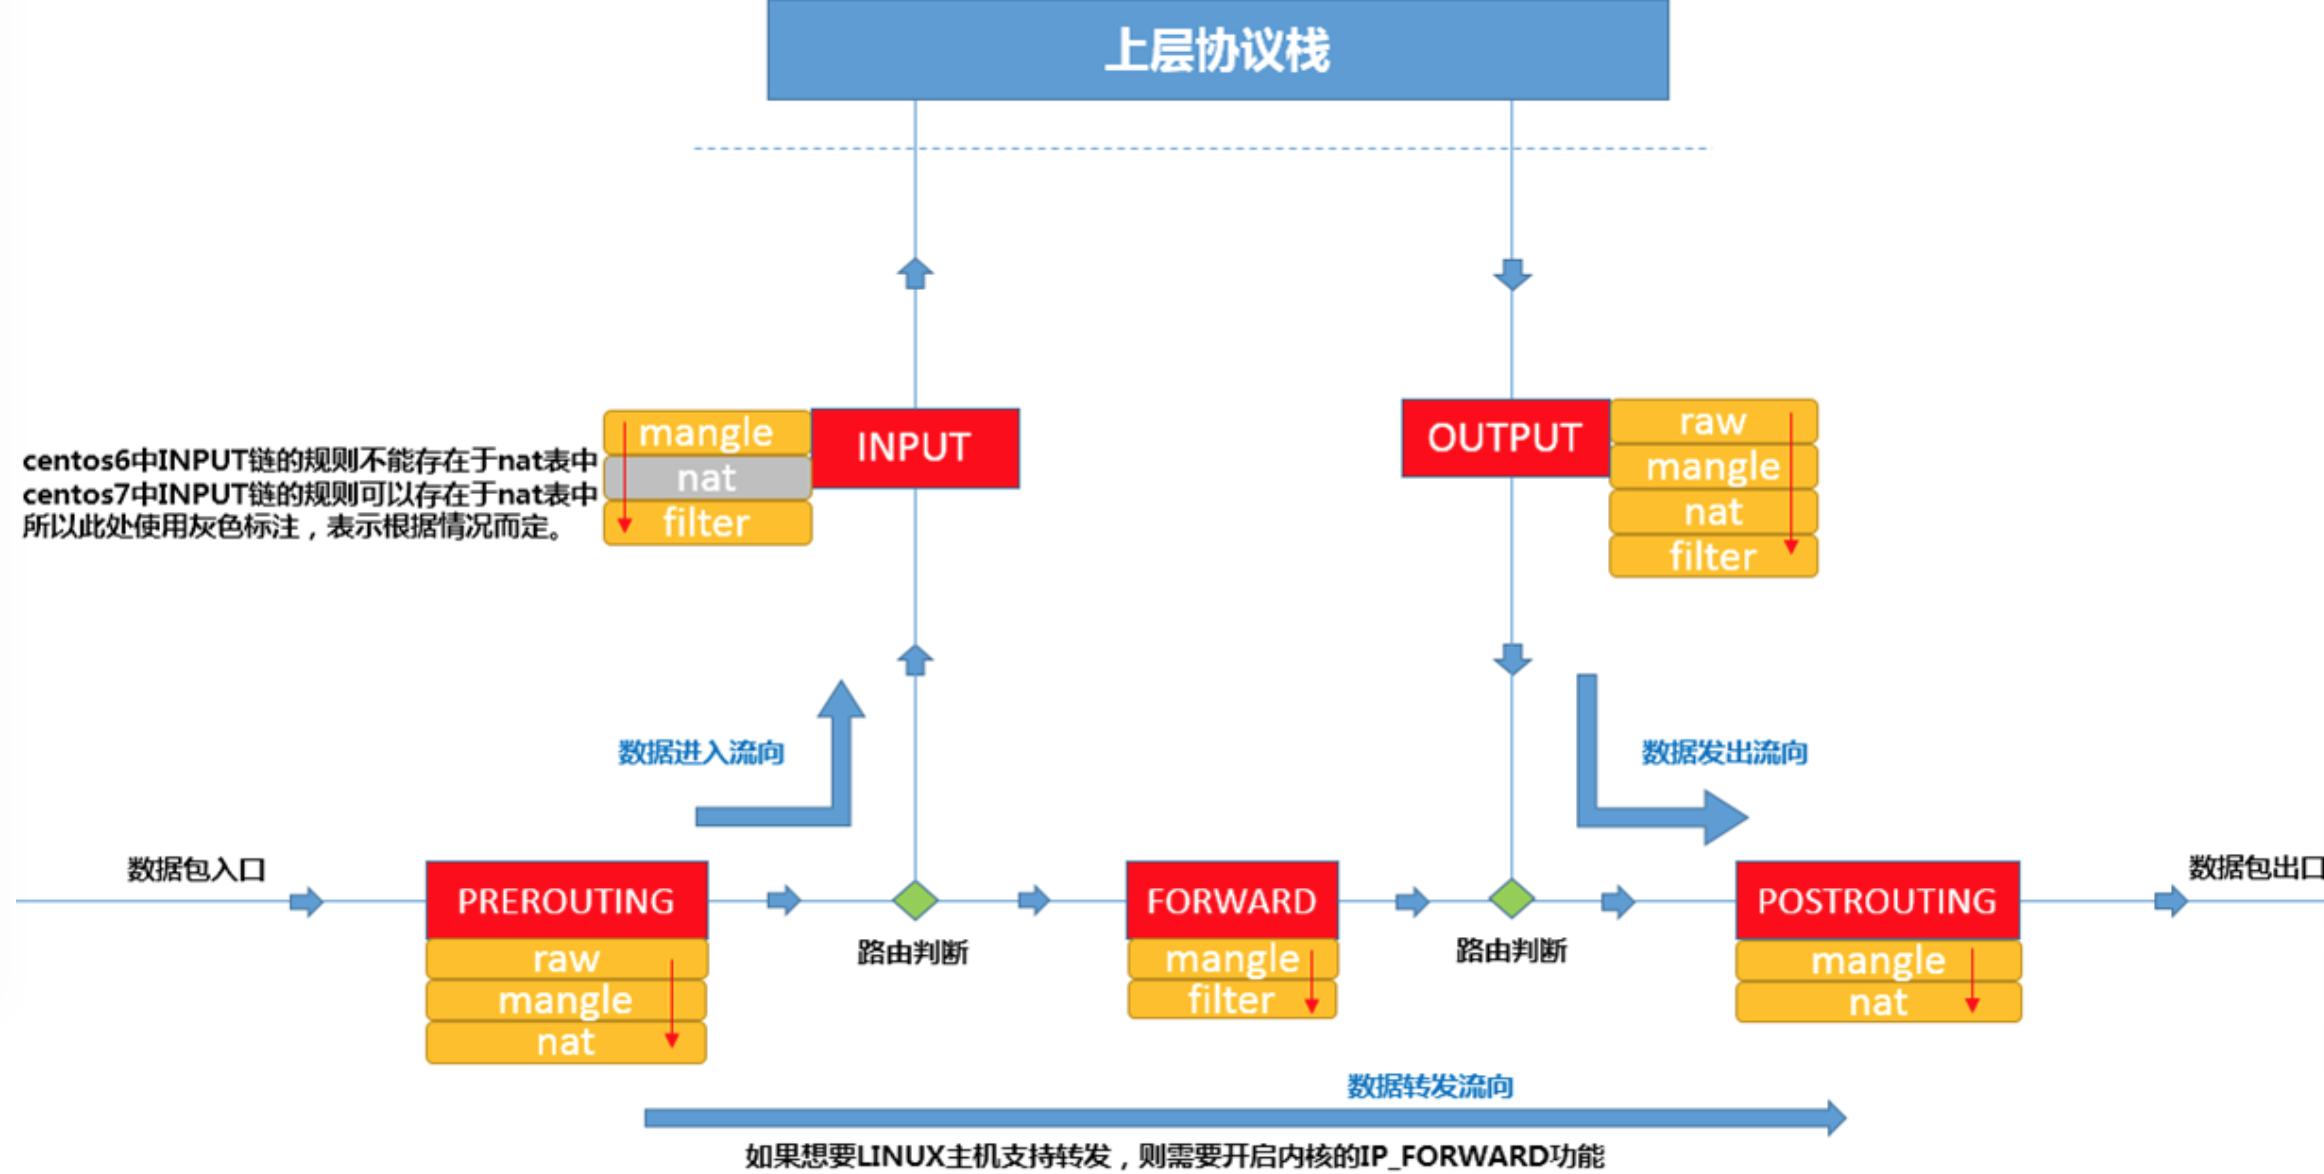
table 有了chain的概念后,为了便于chain中rule的管理,又引入了table的概念,用于存放相同功能的rule,不同功能的rule放到不同的table中。
包括:filter nat mangle raw
filter 默认表,管理本机数据包的进出,用于实现包的过滤,对应内核模块iptables_filter
input:想要进入linux主机的包
nat 管理后端主机进出,与linux主机没有关系,与linux后的主机有关
prerouting:进行路由判断之前的规则(dnat/redirect)
mangle 较少使用,用于拆解报文,修改数据包,并重新封装。
raw raw表的主要作用是允许我们给某些特定的数据包打上标记。
rule 包含了匹配条件和处理动作。
匹配条件包括:source ip、destination ip、source port、destination port
处理动作包括:
accept: 将包交给协议栈
drop:直接丢弃数据包,不给任何回应
reject:拒绝数据包通过,并给一个响应信息,客户端会收到拒绝消息
queue: 交个某个用户态进程处理
dnat:目的地址转换
snat:源地址转换,必须要指定SNAT地址,即–to-source参数,可以是单个ip,也可以是网段。用在POSTROUTING链上。
masquerade: 源地址伪装,跟snat类似,不需要指定SNAT地址,会自动从服务器上获取SNAT的ip地址。如果有多个网卡的情况下,会使用路由选择算法。
mark: 对数据包进行打标签操作
table filter rule的关系 这三者之间的关系还是相当的绕。
链中的规则存在的表 chain中存放了rule,某些chain中注定不包含某些rule。例如prerouting链中的rule仅存在于nat raw mangle三张表中。
prerouting链中的规则存在的表:raw mangle nat
表中的规则可以被哪些链使用 raw表中的规则可以被链使用:prerouting output
表的名字为小写,链的名字为大写
常用操作 查询 iptables 查询默认的表为filter,默认会列出表中所有链的规则
-t 用于指定要操作的表,支持raw mangle filter nat,省略-t选项,默认使用filter表
-L 列出rule
-v 可查看更详细的信息
-n 规则中以ip地址的形式进行显示
–line-number 显示规则的编号
-x 包的计数以精确数字显示
iptables -t filter -L:从表的角度查询规则,用于查看filter表中的所有规则
iptables -L INPUT: 从链的角度查询规则,用于查看INPUT链中的所有规则
iptables -vL INPUT: 从链的角度查询规则,用于查看INPUT链中的所有规则,可查看更详细信息,包含了规则的匹配信息
iptables -nvL:以精确数字显示
修改
-F: 清空规则
-I: 表示插入规则
-A: 表示以追加的方式插入规则
--dport: 目的端口--sport: 源端口-s: 源ip
-d: 目的ip
--match-set:匹配ipset
iptables -F INPUT:清空filter表中的INPUT链中的所有规则。
删除
-D: 删除规则,iptables -D 链名 规则编号,其中规则编号可以通过--line-number查看到。
-F: 清空规则,iptables -F 链名 -t 表名
-X: 删除链 iptables -X 链名 -t 表名
trace 开启trace功能
1
2
3
4
5
# centos7 系统下有效,centos6下内核模块为ipt_LOG $ modprobe nf_log_ipv4 # 用来验证module是否加载成功 $ sysctl net.netfilter.nf_log.2
要开启icmp协议的追踪,执行如下的命令
1
2
iptables -t raw -A OUTPUT -p icmp -m comment --comment "TRACE" -j TRACE iptables -t raw -A PREROUTING -p icmp -m comment --comment "TRACE" -j TRACE
可以通过如下的命令看到插入的iptabels规则:
1 iptables -t raw -nvL --line-number
追踪日志最终会在/var/log/message或者/var/log/kern下看到:
1 Feb 6 11:22:04 c43k09006.cloud.k09.am17 kernel: TRACE: raw:PREROUTING:policy:3 IN=docker0 OUT= PHYSIN=bond0.9 MAC=02:42:30:fb:43:94:5c:c9:99:de:c4:8b:08:00 SRC=10.45.8.10 DST=10.45.4.99 LEN=84 TOS=0x00 PREC=0x00 TTL=62 ID=25550 DF PROTO=ICMP TYPE=0 CODE=0 ID=24191 SEQ=2
格式这块的含义如下:
“TRACE: tablename:chainname:type:rulenum “ where type can be “rule” for plain rule, “return” for implicit rule at the end of a user defined chain and “policy” for the policy of the built in chains.
环境清理,删除刚刚创建的规则即可,其中1为规则的编号:
1
2
3
4
5
# 可以通过此来查询之前创建的规则编号 iptables -t raw --line-number -nvL # 删除规则 iptables -t raw -D PREROUTING 1 iptables -t raw -D OUTPUT 1
实战 试验1 基本规则管理 插入规则 1 2 3 4 5 6 7 8 9 10 11 12 13 14 15 16 17 18 19 20 21 22 23 24 25 26 27 28 29 30 31 32 33 34 35 36 37 38 39 40 41 42 43 44 45 46 47 48 49 50 51 52 53 54 # 清空filter表中的input链规则 [vagrant@localhost ~]$ sudo iptables -F INPUT # 查看filter表中的详细规则,此时从其他机器上ping该ip是通的 [vagrant@localhost ~]$ sudo iptables -nvL INPUT Chain INPUT (policy ACCEPT 7 packets, 388 bytes) pkts bytes target prot opt in out source destination # 增加规则,拒绝192.168.33.1上的请求 # -I:表示插入 # INPUT为要插入的链 # -s:表示源ip地址 # -j:表示要执行的动作 [vagrant@localhost ~]$ sudo iptables -t filter -I INPUT -s 192.168.33.1 -j DROP # 再次查询filter表中的规则,此时192.168.33.1上的报文已经不通 [vagrant@localhost ~]$ sudo iptables -t filter -nvL Chain INPUT (policy ACCEPT 107 packets, 6170 bytes) pkts bytes target prot opt in out source destination 0 0 DROP all -- * * 192.168.33.1 0.0.0.0/0 Chain FORWARD (policy ACCEPT 0 packets, 0 bytes) pkts bytes target prot opt in out source destination Chain OUTPUT (policy ACCEPT 56 packets, 4355 bytes) pkts bytes target prot opt in out source destination # appent一条接收192.168.33.1的请求规则 [vagrant@localhost ~]$ sudo iptables -t filter -A INPUT -s 192.168.33.1 -j ACCEPT # 新增加的序号为2,192.168.33.1的包匹配到1后就停止往下走,因此192.168.33.1还是ping不通当前主机 [vagrant@localhost ~]$ sudo iptables -nvL INPUT --line-number Chain INPUT (policy ACCEPT 65 packets, 3572 bytes) num pkts bytes target prot opt in out source destination 1 9 756 DROP all -- * * 192.168.33.1 0.0.0.0/0 2 0 0 ACCEPT all -- * * 192.168.33.1 0.0.0.0/0 # 插入一条ACCEPT rule,此时192.168.33.1可以ping通当前主机,新插入的规则优先 [vagrant@localhost ~]$ sudo iptables -t filter -I INPUT -s 192.168.33.1 -j ACCEPT [vagrant@localhost ~]$ sudo iptables -nvL INPUT --line-number Chain INPUT (policy ACCEPT 7 packets, 388 bytes) num pkts bytes target prot opt in out source destination 1 0 0 ACCEPT all -- * * 192.168.33.1 0.0.0.0/0 2 10 840 DROP all -- * * 192.168.33.1 0.0.0.0/0 3 0 0 ACCEPT all -- * * 192.168.33.1 0.0.0.0/0 # 新插入一条accept 192.168.33.2的规则,插入位置为2,可以看到插入到2的位置了 [vagrant@localhost ~]$ sudo iptables -t filter -I INPUT 2 -s 192.168.33.2 -j ACCEPT [vagrant@localhost ~]$ sudo iptables -nvL INPUT --line-number Chain INPUT (policy ACCEPT 7 packets, 388 bytes) num pkts bytes target prot opt in out source destination 1 1 84 ACCEPT all -- * * 192.168.33.1 0.0.0.0/0 2 0 0 ACCEPT all -- * * 192.168.33.2 0.0.0.0/0 3 10 840 DROP all -- * * 192.168.33.1 0.0.0.0/0 4 0 0 ACCEPT all -- * * 192.168.33.1 0.0.0.0/0
删除规则 接下在上面实验的基础上测试删除规则
1
2
3
4
5
6
7
8
9
10
11
12
13
14
15
# 删除刚刚创建的规则2 [vagrant@localhost ~]$ sudo iptables -t filter -D INPUT 2 [vagrant@localhost ~]$ sudo iptables -nvL INPUT --line-number Chain INPUT (policy ACCEPT 7 packets, 388 bytes) num pkts bytes target prot opt in out source destination 1 1 84 ACCEPT all -- * * 192.168.33.1 0.0.0.0/0 2 10 840 DROP all -- * * 192.168.33.1 0.0.0.0/0 3 0 0 ACCEPT all -- * * 192.168.33.1 0.0.0.0/0 # 删除source为192.168.33.1,动作为ACCEPT的规则,实际此时执行一次命令仅能删除一条 [vagrant@localhost ~]$ sudo iptables -t filter -D INPUT -s 192.168.33.1 -j ACCEPT [vagrant@localhost ~]$ sudo iptables -nvL INPUT --line Chain INPUT (policy ACCEPT 13 packets, 736 bytes) num pkts bytes target prot opt in out source destination 1 11 936 DROP all -- * * 192.168.33.1 0.0.0.0/0
修改规则 在上面实验的基础上修改规则
1
2
3
4
5
6
7
8
9
10
# 将规则动作从REJECT更改为REJECT [vagrant@localhost ~]$ sudo iptables -t filter -R INPUT 1 -s 192.168.33.1 -j REJECT [vagrant@localhost ~]$ sudo iptables -nvL INPUT --line Chain INPUT (policy ACCEPT 7 packets, 388 bytes) num pkts bytes target prot opt in out source destination 1 0 0 REJECT all -- * * 192.168.33.1 0.0.0.0/0 reject-with icmp-port-unreachable # 每个链都有一个默认规则,当前INPUT链中的默认为ACCEPT # 以下可以修改INPUT链的默认规则为DROP,远程连接慎用,不要问我为什么 [vagrant@localhost ~]$ sudo iptables -t filter -P INPUT DROP
保存规则 防火墙的所有修改都是临时的,重启系统后会失效。iptables会读取/etc/sysconfig/iptables中的规则。
1
2
3
4
5
# iptables-save命令仅会打印当前的规则,需要使用重定向当前规则到文件中 [root@localhost system]# iptables-save > /etc/sysconfig/iptables # 可以从规则文件中载入规则 [root@localhost system]# iptables-restore < /etc/sysconfig/iptables
实验二 各类匹配条件的使用 匹配条件 1 2 3 4 5 6 7 8 9 10 11 12 13 14 15 16 17 18 19 20 21 # 可一次性插入两条规则 [vagrant@localhost ~]$ sudo iptables -t filter -I INPUT -s 192.168.33.1,192.168.33.2 -j DROP [vagrant@localhost ~]$ sudo iptables -t filter -nvL INPUT --line Chain INPUT (policy ACCEPT 31 packets, 1744 bytes) num pkts bytes target prot opt in out source destination 1 0 0 DROP all -- * * 192.168.33.2 0.0.0.0/0 2 0 0 DROP all -- * * 192.168.33.1 0.0.0.0/0 # 可指定ip网段 [vagrant@localhost ~]$ sudo iptables -t filter -F INPUT [vagrant@localhost ~]$ sudo iptables -t filter -I INPUT -s 192.168.33.0/24 -j DROP [vagrant@localhost ~]$ sudo iptables -t filter -nvL INPUT --line Chain INPUT (policy ACCEPT 7 packets, 388 bytes) num pkts bytes target prot opt in out source destination 1 0 0 DROP all -- * * 192.168.33.0/24 0.0.0.0/0 [vagrant@localhost ~]$ sudo iptables -t filter -I INPUT ! -s 192.168.33.0/24 -j DROP [vagrant@localhost ~]$ sudo iptables -t filter -nvL INPUT --line Chain INPUT (policy ACCEPT 19 packets, 1048 bytes) num pkts bytes target prot opt in out source destination 1 0 0 DROP all -- * * !10.0.2.0/24 0.0.0.0/0
协议类型 使用-p来指定协议类型,支持tcp udp icmp等,不指定时默认匹配所有协议
网卡接口 -i来指定从某个网卡进入的流量,仅使用于PREROUTING INPUT FORWARD三条链。
-o来指定从某个网络流出的流量,仅适用于FORWARD OUTPUT POSTROUTING三条链。
实验三 扩展模块 端口 使用了扩展模块tcp udp,默认可以省略
--dport来匹配报文的目的端口,使用时必须指定协议,即-p选项。--sport来匹配报文的源端口,使用时必须指定协议,即-p选项。
端口可以指定范围,例如22:25表示22-25之间的所有端口,22,25表示22和25端口,还可以配合起来使用,比如22,80:88表示22和80-88之间的端口。
1
2
3
4
5
6
# 可以指定目的端口的范围 [root@localhost vagrant]# iptables -t filter -I INPUT -s 192.168.33.1 -p tcp --dport 22:25 -j REJECT [root@localhost vagrant]# iptables -t filter -nvL INPUT --line Chain INPUT (policy ACCEPT 70 packets, 4024 bytes) num pkts bytes target prot opt in out source destination 1 0 0 REJECT tcp -- * * 192.168.33.1 0.0.0.0/0 tcp dpts:22:25 reject-with icmp-port-unreachable
iprange扩展模块 iprange扩展模块可以指定一段连续的ip地址范围。
--src-range和--dst-range用来指定源地址和目的范围。
1
2
3
4
5
[root@localhost vagrant]# iptables -t filter -I INPUT -m iprange --src-range 192.168.33.1-192.168.33.10 -j DROP [root@localhost vagrant]# iptables -t filter -nvL INPUT --line Chain INPUT (policy ACCEPT 17 packets, 968 bytes) num pkts bytes target prot opt in out source destination 1 0 0 DROP all -- * * 0.0.0.0/0 0.0.0.0/0 source IP range 192.168.33.1-192.168.33.10
string扩展模块 匹配报文中包含的字符串
1
2
3
4
5
6
# 匹配报文中包含XXOO的报文 [root@localhost vagrant]# iptables -t filter -I INPUT -m string --algo bm --string "XXOO" -j REJECT [root@localhost vagrant]# iptables -t filter -nvL INPUT --line Chain INPUT (policy ACCEPT 15 packets, 852 bytes) num pkts bytes target prot opt in out source destination 1 0 0 REJECT all -- * * 0.0.0.0/0 0.0.0.0/0 STRING match "XXOO" ALGO name bm TO 65535 reject-with icmp-port-unreachable
其他扩展 time扩展用来根据时间段进行匹配
connlimit用来对ip的并发连接数进行限制
limit模块限制单位时间内进出包的数量
tcp扩展中可以使用--tcp-flags可根据tcp flag进行匹配
state扩展可根据tcp的连接状态进行匹配
实验四 自定义链 1 2 3 4 5 6 7 8 9 10 11 12 13 14 15 16 17 18 19 20 21 22 23 24 25 26 27 28 29 30 31 32 33 34 35 36 37 38 39 40 41 42 43 44 45 46 47 48 49 50 51 52 53 54 55 56 57 58 59 60 61 62 63 64 65 66 67 68 69 70 71 72 73 # 创建自定义链 IN_WEB [root@localhost vagrant]# iptables -t filter -N IN_WEB [root@localhost vagrant]# iptables -nvL Chain INPUT (policy ACCEPT 31 packets, 1780 bytes) pkts bytes target prot opt in out source destination Chain FORWARD (policy ACCEPT 0 packets, 0 bytes) pkts bytes target prot opt in out source destination Chain OUTPUT (policy ACCEPT 16 packets, 1216 bytes) pkts bytes target prot opt in out source destination Chain IN_WEB (0 references) pkts bytes target prot opt in out source destination [root@localhost vagrant]# iptables -t filter -I IN_WEB -s 192.168.33.1 -j REJECT [root@localhost vagrant]# iptables -t filter -I IN_WEB -s 192.168.33.2 -j REJECT [root@localhost vagrant]# iptables -t filter -nvL IN_WEB --line Chain IN_WEB (0 references) num pkts bytes target prot opt in out source destination 1 0 0 REJECT all -- * * 192.168.33.2 0.0.0.0/0 reject-with icmp-port-unreachable 2 0 0 REJECT all -- * * 192.168.33.1 0.0.0.0/0 reject-with icmp-port-unreachable # 将IN_WEB自定义链添加到INPUT链上 [root@localhost vagrant]# iptables -t filter -I INPUT -p tcp --dport 80 -j IN_WEB # 可以看到INPUT链中多出了IN_WEB链 [root@localhost vagrant]# iptables -nvL Chain INPUT (policy ACCEPT 35 packets, 2012 bytes) pkts bytes target prot opt in out source destination 0 0 IN_WEB tcp -- * * 0.0.0.0/0 0.0.0.0/0 tcp dpt:80 Chain FORWARD (policy ACCEPT 0 packets, 0 bytes) pkts bytes target prot opt in out source destination Chain OUTPUT (policy ACCEPT 18 packets, 1408 bytes) pkts bytes target prot opt in out source destination Chain IN_WEB (1 references) pkts bytes target prot opt in out source destination 0 0 REJECT all -- * * 192.168.33.2 0.0.0.0/0 reject-with icmp-port-unreachable 0 0 REJECT all -- * * 192.168.33.1 0.0.0.0/0 reject-with icmp-port-unreachable # 重新定义自定链名字 [root@localhost vagrant]# iptables -E IN_WEB WEB [root@localhost vagrant]# iptables -nvL Chain INPUT (policy ACCEPT 39 packets, 2244 bytes) pkts bytes target prot opt in out source destination 0 0 WEB tcp -- * * 0.0.0.0/0 0.0.0.0/0 tcp dpt:80 Chain FORWARD (policy ACCEPT 0 packets, 0 bytes) pkts bytes target prot opt in out source destination Chain OUTPUT (policy ACCEPT 20 packets, 1520 bytes) pkts bytes target prot opt in out source destination Chain WEB (1 references) pkts bytes target prot opt in out source destination 0 0 REJECT all -- * * 192.168.33.2 0.0.0.0/0 reject-with icmp-port-unreachable 0 0 REJECT all -- * * 192.168.33.1 0.0.0.0/0 reject-with icmp-port-unreachable # 由于iptables有自定义链,不能删除 [root@localhost vagrant]# iptables -X WEB iptables: Too many links. # 将INPUT链引用的WEB链删除 [root@localhost vagrant]# iptables -D INPUT 1 # 此时仍不能删除自定义链,因为自定义链删除,需要上面没有任何规则 [root@localhost vagrant]# iptables -X WEB iptables: Directory not empty. # 先清空自定义链的规则后可以删除 [root@localhost vagrant]# iptables -F WEB [root@localhost vagrant]# iptables -X WEB
ref